Insert the can fully in the sleeve. Lock the can in place with one or more pushpins stuck into its side at the upper holes (the "anchor" holes). Use another pushpin to pop starter holes in the upper left (or upper right, for lefties) corner of the top of each slot.
The key to this particular step is holding the can and knife properly. You'll want the Aluminator resting on a table, preferably stabilized with your nondominant hand. You'll want to cut with the NON-SHARP side of the knife. The dull side will curl a strip of metal away and leave smoother edges. You'll need to penetrate the can at an acute angle — not a 90 degree angle.
You'll place the tip of the paring knife into the starter hole then poke it through. As you drag the knife downward, you'll want to hug the flat side of the blade against the edge of the slot. Drag the knife down through the slot with firm, steady, and smooth pressure.
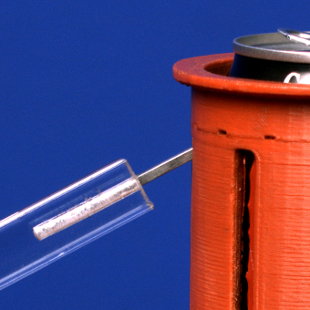
Again, be sure to keep an acute angle between the slider and the can. The angle between the slider and the wall of the sleeve should be less than 45 degrees, as shown in the photo below.
As the number of slices you'll make around the can exceeds eight (e.g., when making the turtle, octopus, jellyfish, scorpion, or spider), you'll want to add extra pushpins in the sleeve. Otherwise, the can might collapse inward and downward from lack of internal structural support.
If you mess up the slotting severely, just start over with a new can. Don't try to salvage the old one. It'll take a bit of practice at first, but you'll be making perfect slices in no time.
Extra Slices
Making more than 8 slices along the sides gets a little tricky. This could take some practice. The difficulty arises because the can loses structural strength as more slices are made in its side. Still, some designs require a 12-slice can (turtle, scorpion), a 13-slice can (spider), or a 16-slice can (octopus, squid, ornament); so it's worth learning.
After making the your initial 8 slices, remove the pushpin and lift the can up so that the pushpin-anchor-hole you popped in the can is exposed. Rotate the can a 1/16th turn so that the next sleeve-hole is directly below the pushpin-anchor-hole. Re-insert the can in this new orientation and then (this is the first tricky part) insert the pushpin through both the next sleeve-hole and the original pushpin-anchor-hole. It can be difficult to find the original pushpin-anchor-hole by feel with the tip of the pushpin.
Congratulations. You've now made a half-panel rotation in the can and locked it in place. Insert more pushpins all around the can (at least three more).
Again, if you run into any problems making these additional slots (e.g., the can collapses in the sleeve), start over with a new can. Don't try to salvage the one you started with.
Disco Aluminator Side-Slicing
As shown in the video, you'll be poking "lines" of holes that will guide your scissoring later. The results you obtain won't be as good as the results you'd get with the Aluminators that have the slots down the side, but at least you've gotten some additional functionality out of your Disco Aluminator, and you didn't have to use a paring knife.