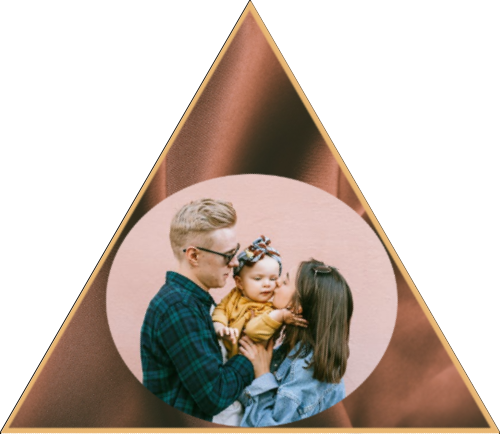
PhotoTet™ Frame
Who doesn't love photocubes?
They're great! But tetrahedrons are better.Why?
Well, for one, the triangular panels are angled up at the viewer's eyes — like a real photo frame. Two, if you leave the bottom open, you can stack your tetrahedrons like Dixie cups (which makes a cool photo album equivalent). And finally, tetrahedrons are just more interesting and engaging. They've got more style — just like you!
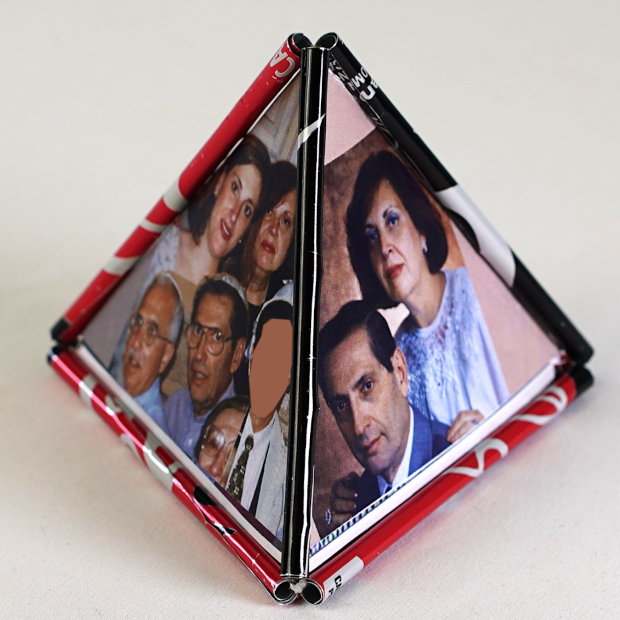
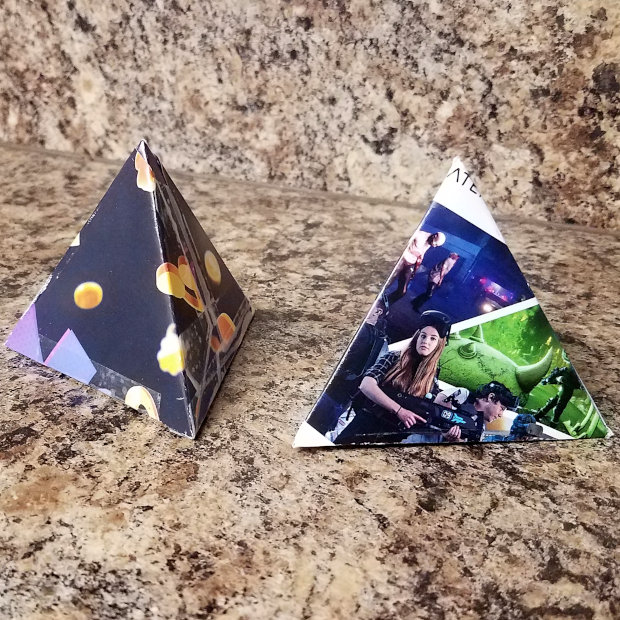
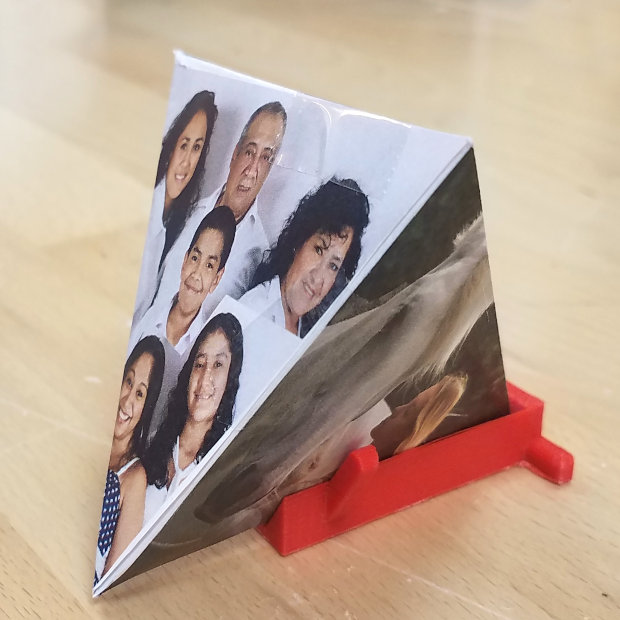
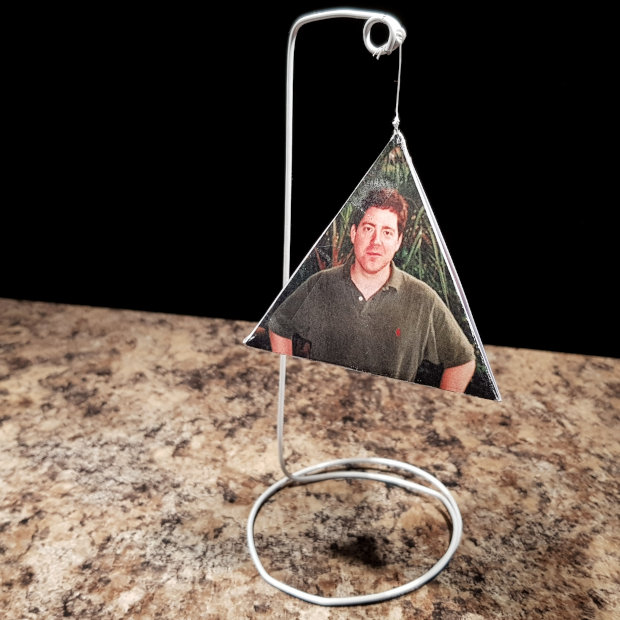
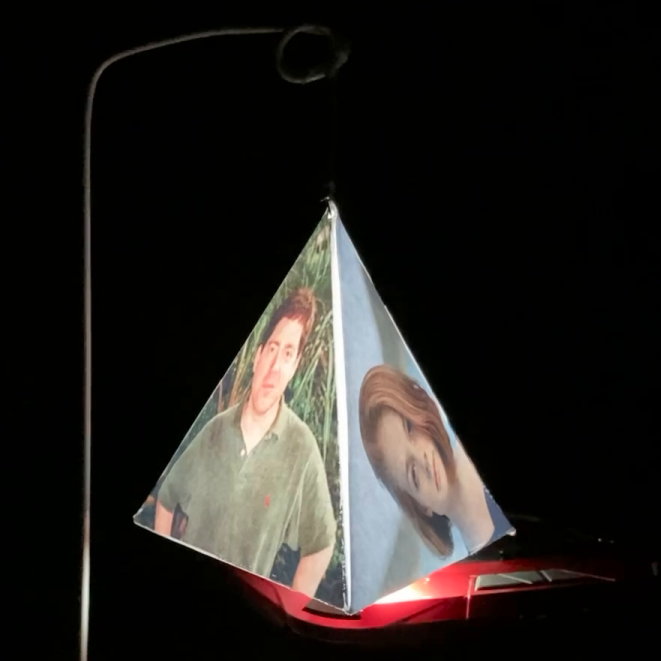
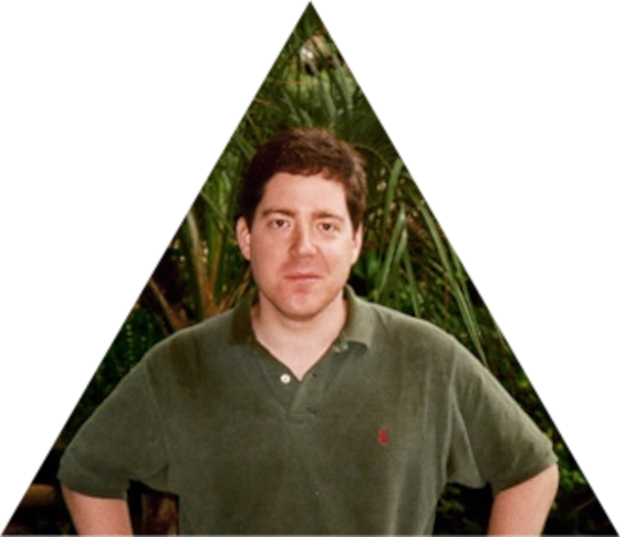
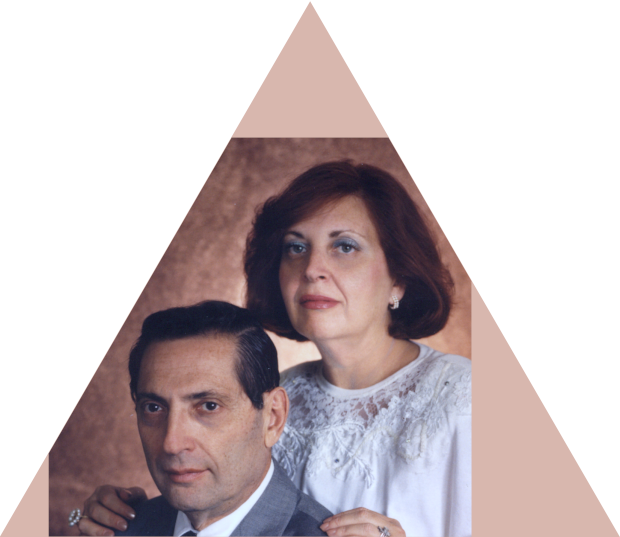
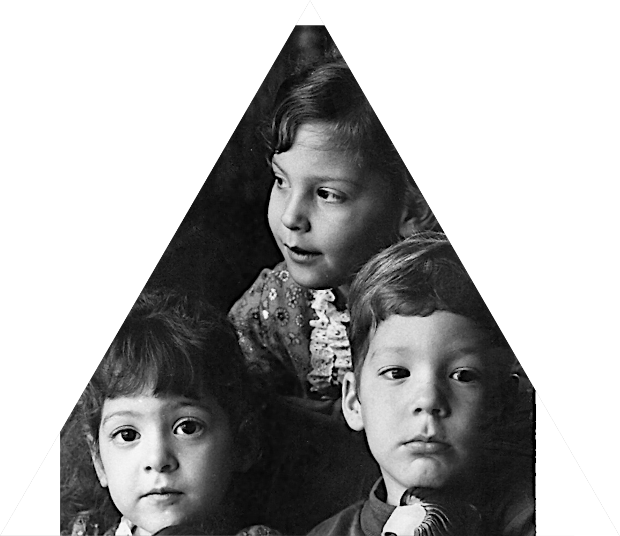
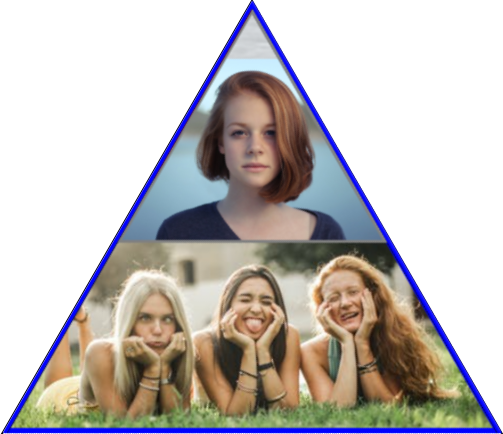
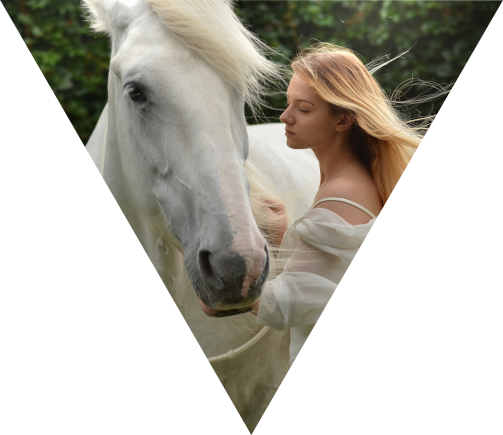
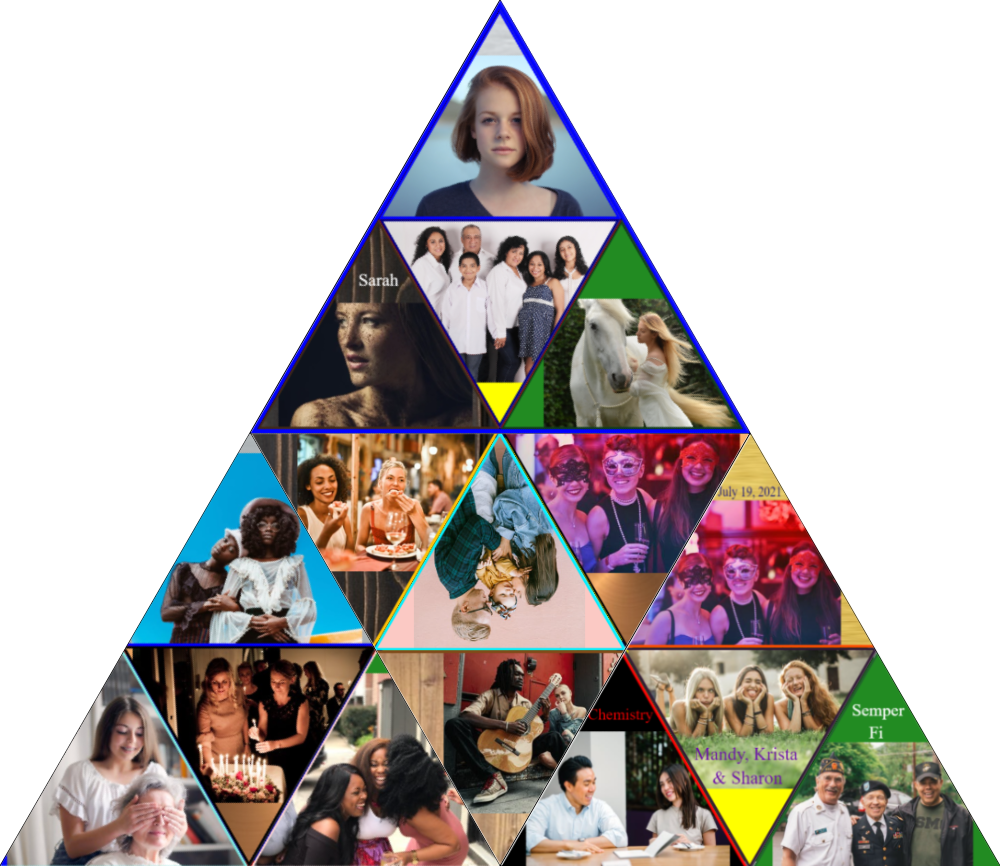
Examples

How do I make one?
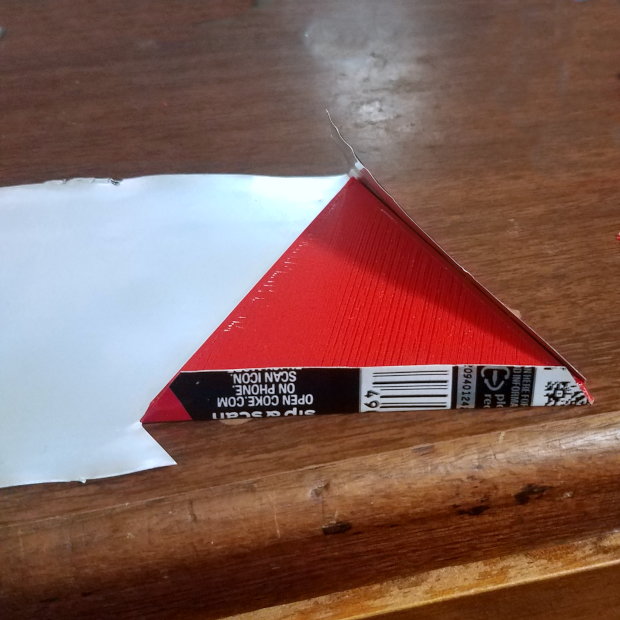
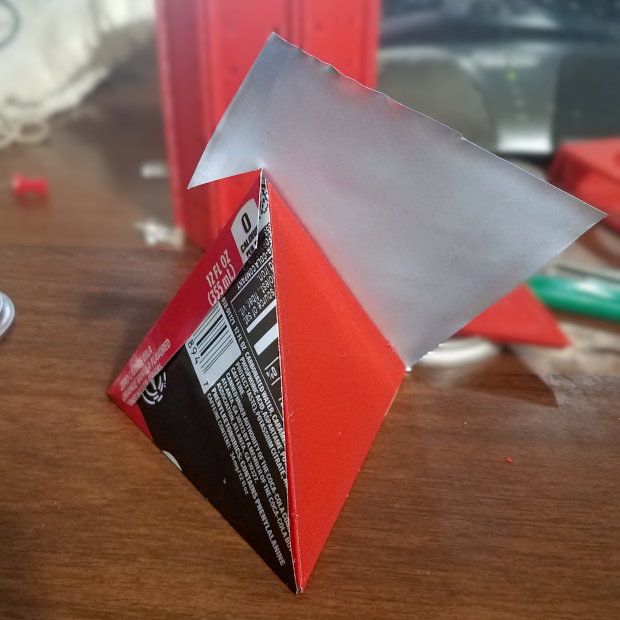
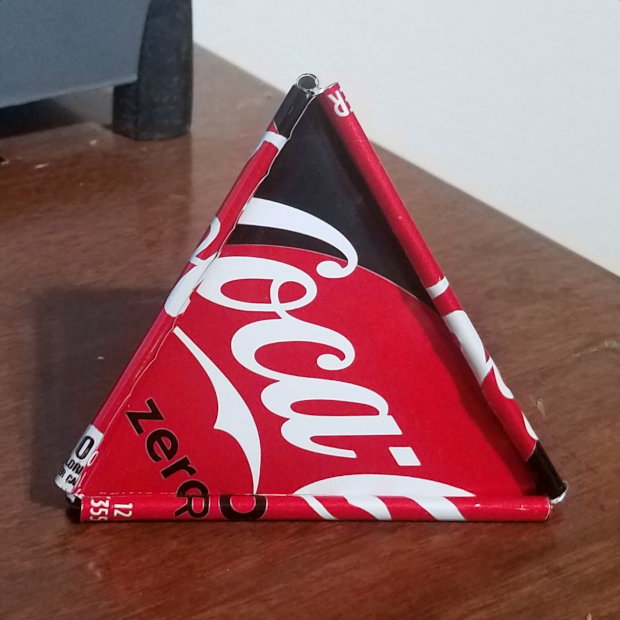
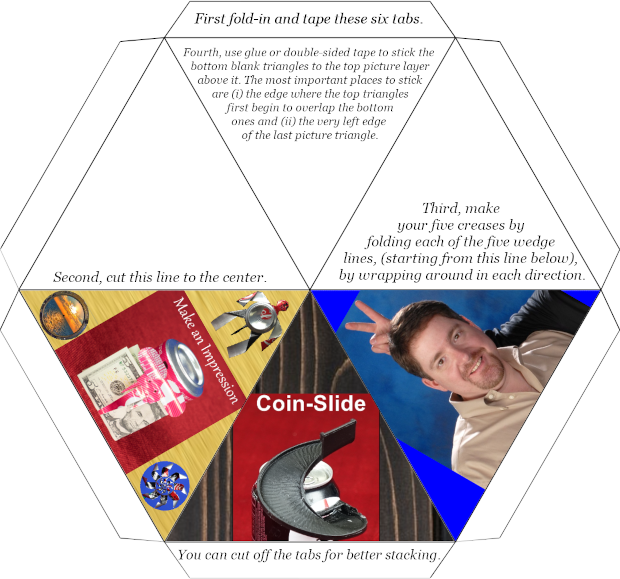
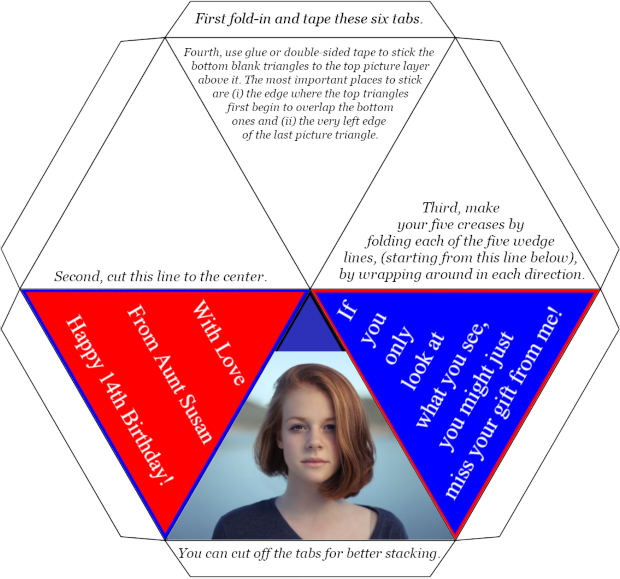
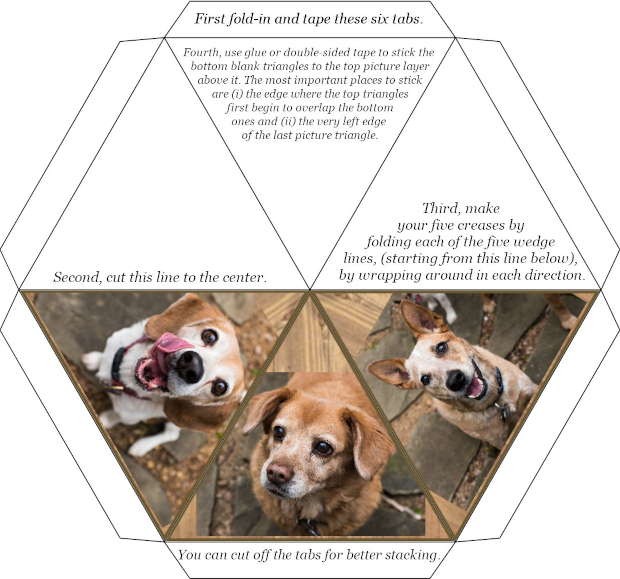
You'll fold a flat piece of paper, junkmail/cardstock, or aluminum sheeting once or twice around a solid, tetrahedron-shaped form. You'll crease the edges, then extract the solid form from the PhotoTet™, and then tape up the optional bottom image to complete the tetrahedron shape.
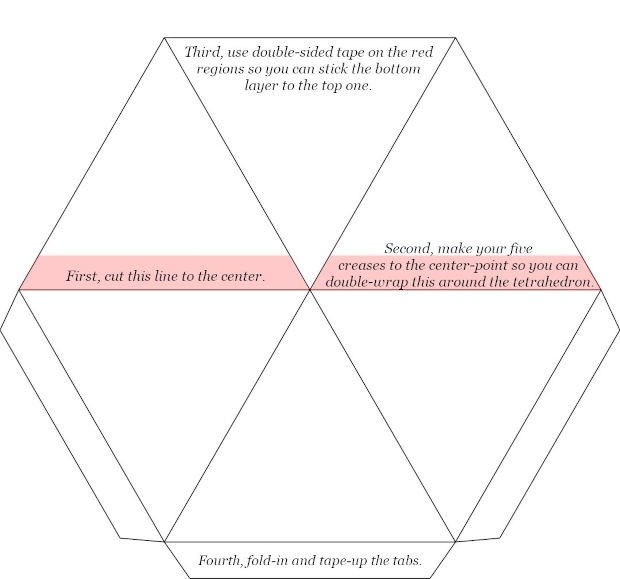
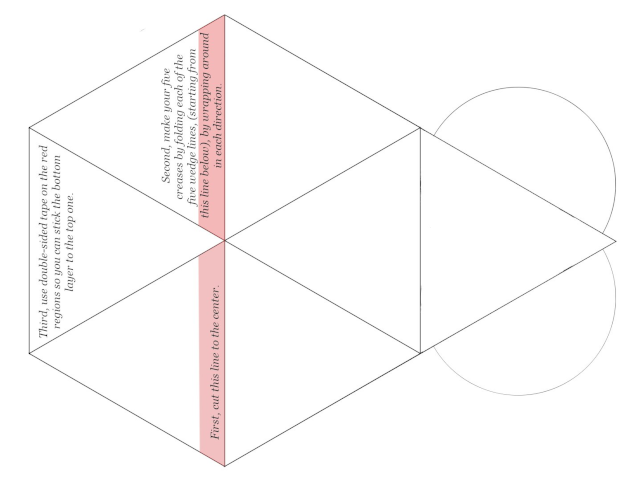
As you can see, a hexagon is made of six equilateral triangles grouped around a center point. So if you print your photos on three of those triangles, you can then wrap the hexagon twice around the top surface of the tetrahedron. You'll get two layers of triangles on the top surfaces of the PhotoTet™ form for added strength, stability, and opacity. This open-bottom design allows you to stack multiple PhotoTets™ like plastic Solo cups (or Russian nesting dolls, if you prefer).
The tube-cage around the edges of the PhotoTet™ is optional and decorative. I made it by running dental floss through three tubes of identical length to make a triangle, knotting it, then similarly making additional triangles along each edge of the first triangle, then knotting them all together with more dental floss. The PhotoTet™ is then slipped inside.
The great thing about this idea is that the red plastic form is reusable. You can make hundreds of PhotoTets™ from it. All you need is access to a color printer, clear tape, and your own creativity to make an inexhaustable supply of unique, thought-provoking gifts for your friends.
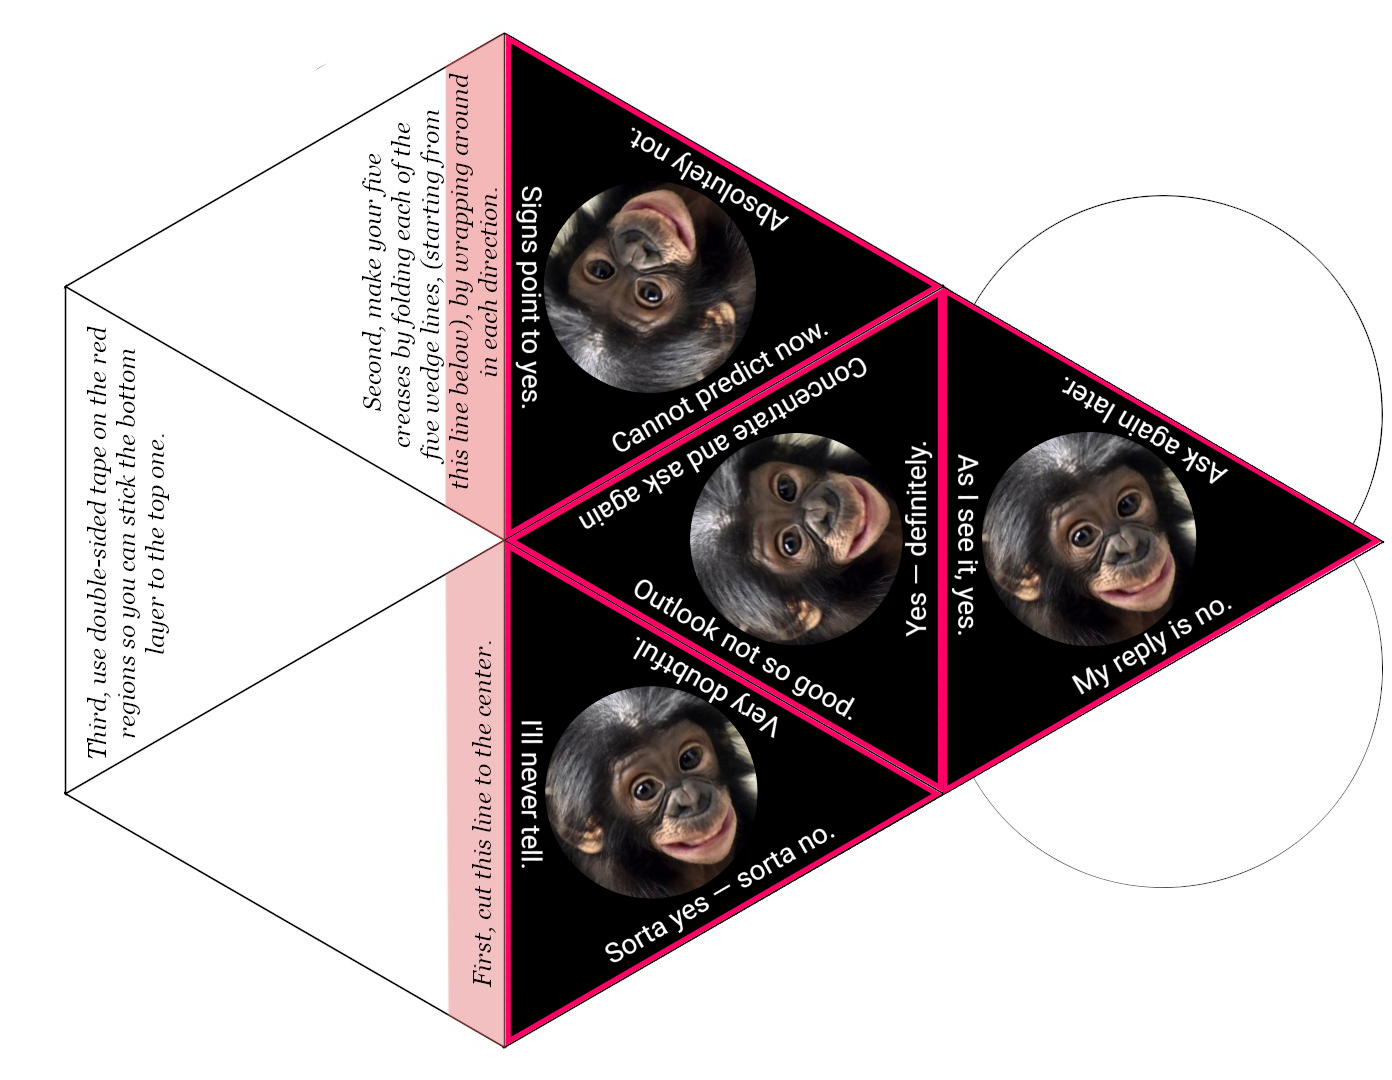
PhotoTets™ can be Christmas ornaments, table-or-mantlepiece decorations, three-dimensional cards for presents, table-seating cards, giant "Magic 8-Ball" dice, or cute paperweights/coinbanks. When lit from the inside with color-changing LEDs or a cell phone's flashlight, they're magical.
Make a PhotoTet™
This website contains instructions and an Online Tool you can use to make PhotoTet™ collages from photos you have on your desktop, laptop, or phone. You'll edit your photos, compose them into equilateral triangle shapes, and then select your border color, background color, and/or background image. You can add decorative text or messages, too, for that personalized flair. You can even make circular photos with transparent backgrounds that you can use for other Aluminoid™ projects — like making custom pinwheel photoframes or custom fidget spinners.
The Online Tool will automatically populate the PhotoTet™ templates as you go, adding your photos in the correct resolution, size, position, and orientation. You can download the photos and templates for printing later.
One template will simply fill the top three triangles of the tetrahedron. Another fills all four sides. Another uses four upside-down triangles, since some photos are best displayed that way. Two others let you recursively fill triangles-within-triangles, in either normal or upside-down orientation.
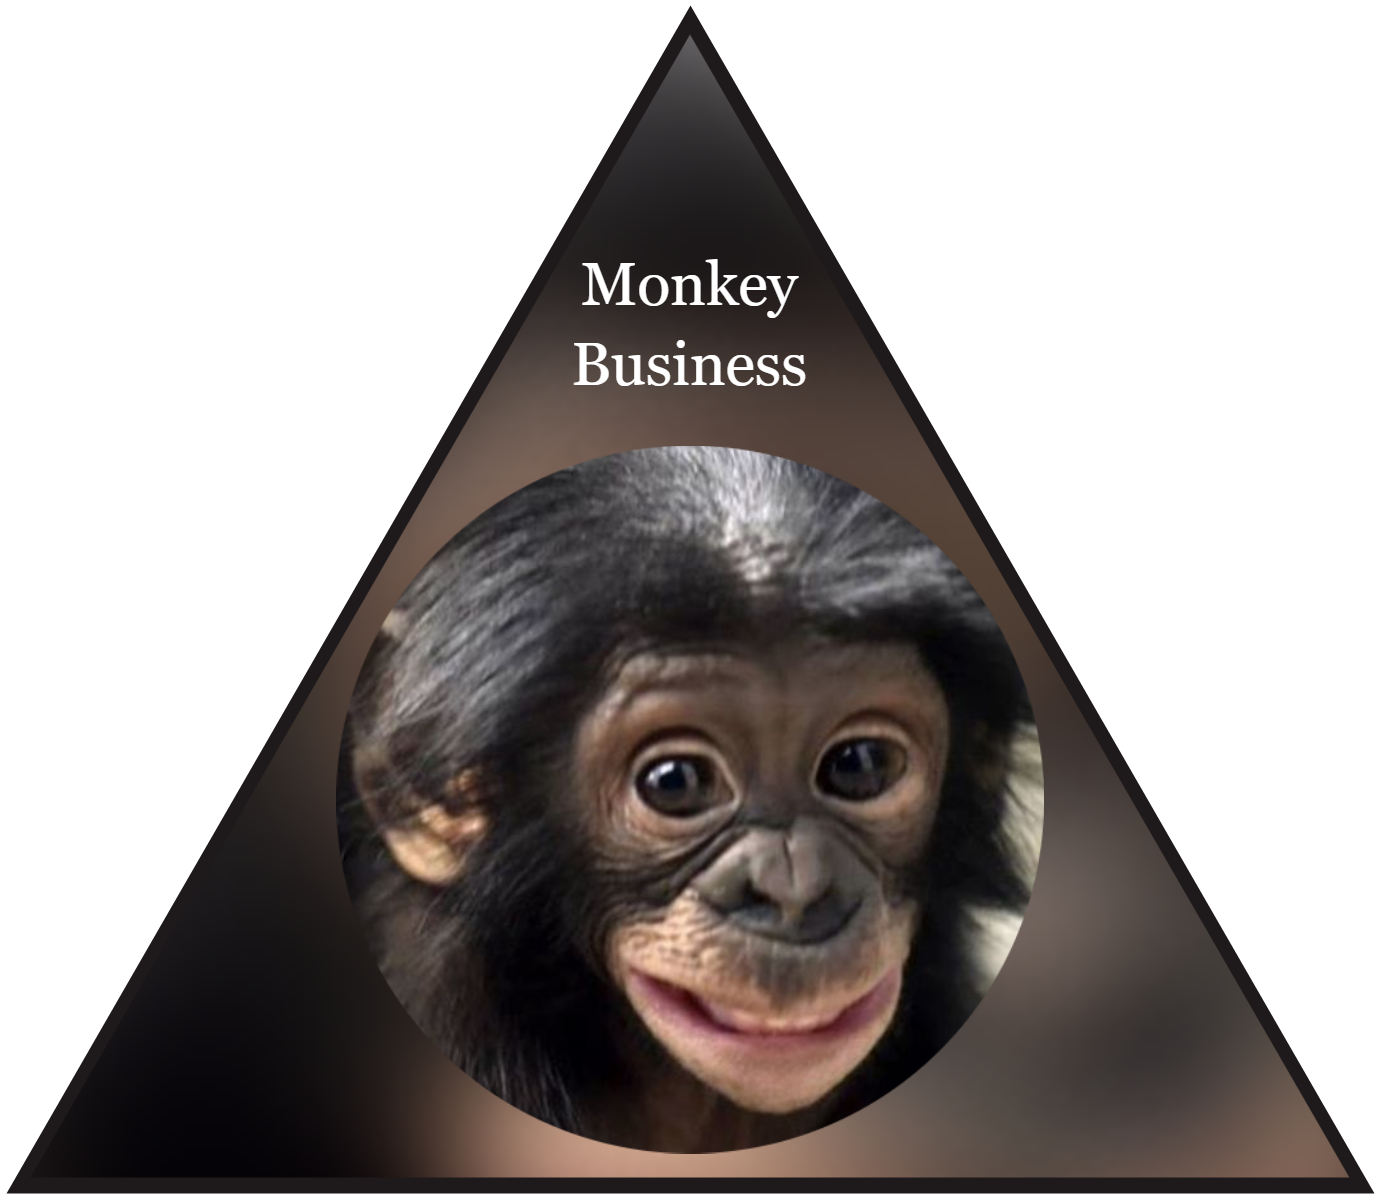
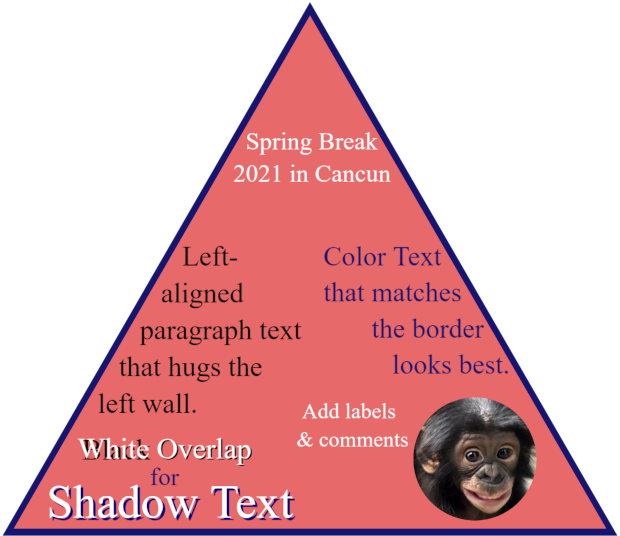
Please take a look at the following examples for ideas on how to make the best images for your PhotoTet™:
Before starting, you'll want to watch this video and read the following instructions.
Instructions
-
Whatever you move into the triangle will be your Phototet™ picture.
-
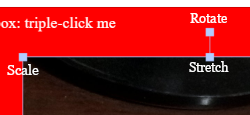
When you select an image by clicking on it, little blue boxes will appear all around it. These let you scale, stretch, and rotate ("transform") the picture by dragging them:
If the blue squares aren't showing, then you've actually clicked on something that's in front of the thing you tried to select. I'll explain later how to switch the stacking order so that the thing you want to click-select is on top.
-
The squares at the middle-left, middle-right, middle-top, and middle-bottom of the picture will distort the picture by stretching or squeezing it. The squares in the corners will scale the picture smaller or larger in different directions -- without stretching or squeezing it. The uppermost box rotates the image. The blue squares are draggable when the four-direction-move cursor
 changes to a
two-direction cursor:
changes to a
two-direction cursor:
 ,
and that happens when you hover the cursor directly on top of the blue square.
You can move the
picture around the canvas when the cursor changes to this:
.
,
and that happens when you hover the cursor directly on top of the blue square.
You can move the
picture around the canvas when the cursor changes to this:
.
-
You can do the same transformations with text boxes, but only if you make copies of them. The original text boxes cannot be transformed. (Incidentally, stretching or squeezing the text makes for some interesting font effects.) The border triangle, the border circle, the center-marking dot, the center-axis line, and the ruler can never be copied, transformed, or destroyed, but you can change their color or flip them upside-down. You can toggle these on-and-off the page by using the row of buttons on the bottom of the canvas.
-
You'll want to set the colors for the text, background, and border triangle. Those buttons will open up a clickable color box. The color boxes work differently in different browsers, but in Chrome and Edge, pressing the color box
 will open a window that looks like this:
.
You'll pick the hue you want by sliding the bar right or left, and then you can
drag the small
white-circle-dot around until you find the brightness and shading combination
for that color that
you think is the best choice.
It's best to match or complement the colors of your main subject, so I recommend
using the
eyedropper tool
will open a window that looks like this:
.
You'll pick the hue you want by sliding the bar right or left, and then you can
drag the small
white-circle-dot around until you find the brightness and shading combination
for that color that
you think is the best choice.
It's best to match or complement the colors of your main subject, so I recommend
using the
eyedropper tool  .
After clicking it, you'll scroll over the image until you find a color within it
that you like. Then
click again to announce your color choice to the browser.
Then click
.
After clicking it, you'll scroll over the image until you find a color within it
that you like. Then
click again to announce your color choice to the browser.
Then click Enter(or click a different spot on the page) to set the color. Dark border colors look best against light background colors. -
The canvas "thinks" in terms of mostly-invisible layers that are stacked on top of each other. When you started, your canvas had at least three layers:
- (i) the triangle-border layer,
- (ii) the text layers, and
- (iii) the button-commands layer (at the bottom edge).
(The background color and any "Background" image you've imported will always stay at the back/bottom, though, no matter what you do with them.)
Then you added your photo, which got dropped on top of the pile. So if you next added a new photograph to the canvas, it will get dropped on the pile and will cover up everything else. You'll have to move it backward/deeper into the pile after playing around with its transformations (e.g., size or position). Also, when you click or move a thing, that thing will linger on top of the pile until you've disengaged with it by clicking off somewhere else. Then it will position itself at the layer level it occupied before you started engaging with it. While you're working with something and its blue boxes have appeared, it'll always move itself on top of everything else temporarily.
Sometimes it helps to think of these "layers" as objects in the foreground or background (like in photography), and sometimes it's easier to think of them like pancakes stacked on each other. It depends on how your mind works best.
I remind you that the triangle-border layer, the circle-border layer, the center-marking dot, the center-axis line, and the ruler can't be moved or transformed, but they can be flipped upside-down or copied. The original text boxes can't be moved or transformed either, but you can copy them by clicking the icon that will appear below them. There are complicated, valid, but uninteresting reasons for why things have to be this way. Just know that whenever you kill-then-revive one of these objects, it will revive itself on the top of the pile.
All this means that, when reordering the images and text box copies, you may need to press the
Up-FrontorDown-Backbutton — usually a few times. It will appear like nothing happened, since the changes don't register on the canvas until you de-select the re-ordered object by clicking-off somewhere else on the canvas. So again, if you're having trouble selecting the image or a text box because it's hiding behind something else (e.g., the image, triangle, the circle), you need to re-order the stacking of the layers or kill and revive a few things. -
The
Send Belowbutton will send your finished work down to the collage windows. ThenDownloadit so you can print, cut and fold it into its shape. It's a good idea to save your individual triangles before sending them down to the collage — just in case. -
The Background image can't be selected, so the only way to kill it is to replace it with the special "None" background, using the pink
Backgroundbutton. -
The text and images will print out at a better quality than shown in the canvas window. It's faster for computers to render these things at a lower quality while you're working with them.
-
Caution — pictures sometimes cover only parts of the borders, so be sure to bring the triangle-border layer to the front before you press
Send Below. -
You can quickly "delete" a text box or image by dragging it off-screen.
-
If you want to pick your own image to use as a background, that's easy. Just select two different pictures and place the larger one on the canvas behind the smaller one. Or you can add to your canvas a blurred-enlarged-duplicate image of your original image to use as a color-matching background. Warning: large images with very high resolution may need to be re-blurred by saving, re-importing, and then re-blurring them repeatedly.
-
Sometimes you want several pictures shoved into one triangle. You can load multiple pictures directly into the same canvas and then arrange them to your liking. Or you can use the Triangle-of-Triangles template(s). It will create transparent areas in any interior triangular spaces that you leave blank. Then you can save the result, reset the page, and use the result as one of your new photographs in a multiple-photo panel.
-
The
Show It Bigwill enlarge your image for 2.5 seconds and then revert back to your canvas. You can press it repeatedly, if desired. -
I lack the skill to make this website mobile-friendly. The working canvas can't be shifted-around horizontally or vertically within the page without moving the entire page. And sometimes the entire page moves when all you wanted to do was move a particular object around within the canvas. And sometimes you need to move the page around or pinch-zoom in or out but you're trapped in the canvas at a fixed size. And the buttons/controls get very small and untouchable when you're zoomed out viewing the entire canvas. By the way, if you need to touch outside the canvas, you can rotate your phone from portrait mode to landscape mode so you "create" some out-of-canvas real estate.
-
Sometimes you need to know where the center-axis of the triangle is. Click the circular red button in the bottom-right corner of the canvas that is marked "L" for line. It will make a vertical guideline appear or disappear each time you click it. Likewise, if you need to know the center of the triangle or circle, you can click the black button marked "C" for center in the bottom-left corner. A dot that marks the triangle's and circle's center will appear on the canvas. And sometimes you need to make sure that your text boxes are horizontally aligned with each other or are evenly distanced from the triangle's sides. The "R" for ruler button will make a liftable, center-aligned ruler appear.
-
Some buttons (e.g.,
Flip Triangle, italics-checkbox, shadowed-checkbox, color-picking,Up-Front,Down-Back) don't rewrite their changes to the canvas until you do one of these things: (i) hit theTabkey, (ii) hit theEnterkey thenTab, (iii) click on or off the canvas somewhere, or (iv) click the blue button namedEnter -
You can get an interesting two-tone border effect by saving your photo with one border color, re-importing it, and then changing to a different color border that will now only partially "overlap" the old border.
-
Bug 1: Sometimes you have to click-off on the page somewhere before a button's effects happen.
-
Bug 2: If your scroll wheel goes dead or the page freezes up, click outside the page (like, on another browser tab) and then come back to the PhotTet™ page and that should fix it.
-
Bug 3: Some buttons have to be clicked slowly and deliberately. If you tap them quickly or gently, they ignore you.
-
Bug 4: You may need to import a second copy of your photo if you've marred the original by accidentally stretching or rotating it. But if you try to import that same picture twice in a row, it will ignore the second request. You have to import something else first, throw it away, and then it'll let you import the second copy of your photo (when it becomnes your third request).
Editing Your Picture
I hope you have access to (and expertise in) Adobe Photoshop or Gimp. If not, Pixlr.com has image editing software that will allow you to adjust saturation, blur, colors, contrast, brightness, sharpness, grayscale, crops, and so on. It's excellent, online, and free. I'm not affiliated with Adobe, Gimp, or Pixlr in any way.
Pixlr has two special features that are
useful for this project.
First, it has a Cutout/Mask tool within their Shape tool 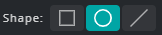 that lets you put an oval or circular
crop around your
image.
that lets you put an oval or circular
crop around your
image.
This helps you "fit" naturally square or rectangular images into the triangle.
Second, Pixlr has a tool that helps you find
coordinating or contrasting colors (shades,
triadic,
tetradic, analogous, and complement) for your image.
This is useful when picking background colors or border colors.
[Chrome and Edge browsers have a similar eyedropper tool built into their color selector
(look for the
eyedropper icon
![]() at the
left-middle-edge
of the color-picking mini-window). Regrettably, it doesn't identify the coordinating and
contrasting
colors.]
at the
left-middle-edge
of the color-picking mini-window). Regrettably, it doesn't identify the coordinating and
contrasting
colors.]
It's not obvious how you can activate and use the Pixlr color-picker. After opening your image, you'll click the top circle of the two, overlapping, colored circles on the left-side menu bar. A box named "Color picker" will open, displaying the color information for the top circle you've selected.
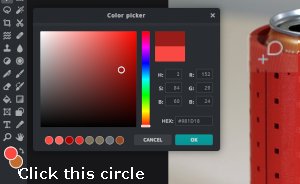
Then you'll run your plus-shaped cursor
![]() over the
color within
your image that you want to inspect. Then click it and identify/note its changed, color
numeric values
(HSB or RGB or Hex).
Close the color picker. The top circle should now have changed to the new color you've
selected.
Then click the eyedropper tool
over the
color within
your image that you want to inspect. Then click it and identify/note its changed, color
numeric values
(HSB or RGB or Hex).
Close the color picker. The top circle should now have changed to the new color you've
selected.
Then click the eyedropper tool ![]() above the overlapping circles.
The top bar will display your coordinating/contrasting color-circles, like so:
above the overlapping circles.
The top bar will display your coordinating/contrasting color-circles, like so:

Then click the color-circle you want. As before, you can use the overlapping circles to identify the numeric values (HSB or RGB or Hex) of the new, changed, top-circle color representing the complementary color.
Now that you've written down your ideal color values, you can reference them when making your PhotoTet™ using the next webpage.
Fun to Spin