
Put the can partially in the sleeve and lock it in place using two pushpins that are inserted on opposite sides of the sleeve. Scratch a mark around the circumference of the soda can by dragging another pushpin around the top edge of the sleeve's upper rim. Then remove the pushpins, fully insert the can in the sleeve, lock it in place with a pushpin, pop in your 8 starter holes with a pushpin at the exposed part of the can wall near the upper corner of the slots, and make your 8 vertical panel cuts in the can's side using the slider tool. Don't press too hard as the slider makes the bottom part of the slot, since you can distort the panels from circular-chord-segment perfection.
Extract the can and cut carefully -- very carefully and exactly -- along the scored line. Then use the centering wheel to push a pushpin in the exact center of the domed can bottom. Enlarge the hole to toothpick size with the larger thumbnail. Rinse and dry the can.
Print out and cut out your images. Be sure to cut very, very precisely along the outer lines of the images.
Make sure, as you're orienting and taping the pictures on the inside can wall, that each image lines up with its neighbor horizontally. Each image must be standing perfectly straight vertically and identically against the left edge of the panel. Carefully tape it into place, folding half the tape over the top outer edge of the curved, rectangular can segment. Shove the toothpick through the center hole in the can bottom from the underside direction penetrating in the axial direction. It's important in this step that the toothpick isn't inserted at any angle other than along the can's axis. To lock the toothpick in place, use a toothpick clip.
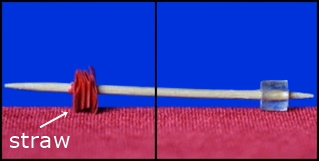
[Or, if you don't have a toothpick clip, take small segments of soda straw, pierce a hole in it using only a pushpin, and thread the top of the toothpick through it until the straw segment lies flat against the bottom. Repeat several times, until the straw is locked in place. When selecting a straw for this purpose, use a McDonalds straw. Their stronger plastic works better than those clear plastic straws made from flexible polyethylene, and it makes a difference.]
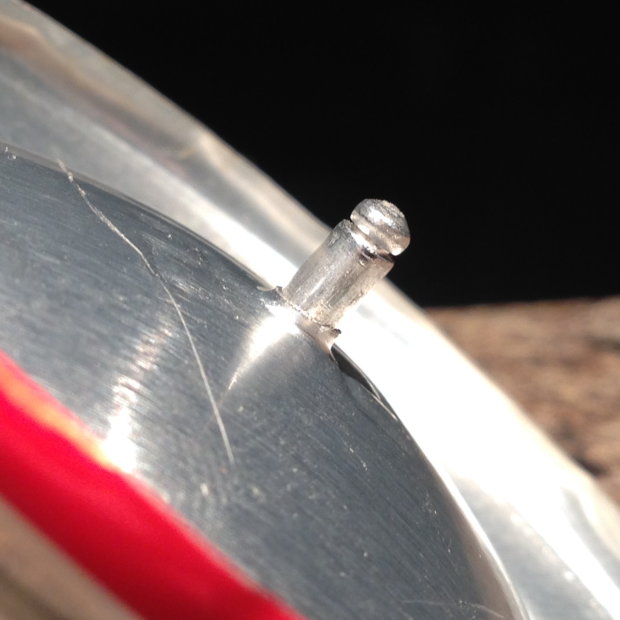
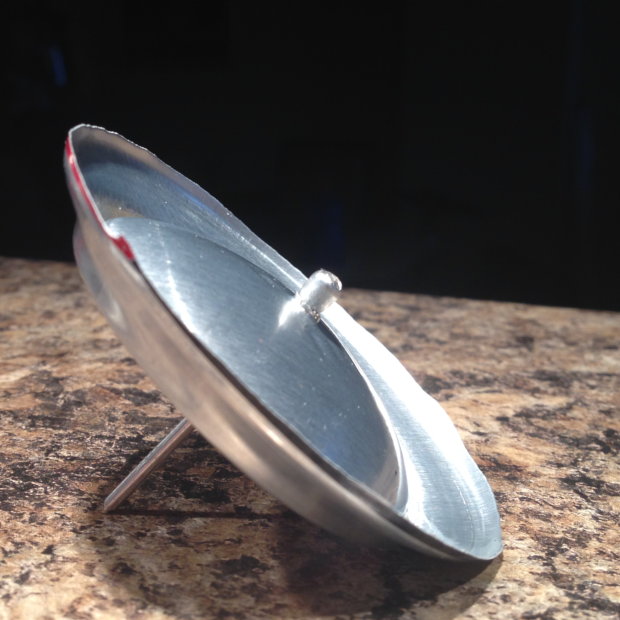
As an alternative to the toothpick, you can use a rivet as shown on the Instructions page. The center would look the spinner does when riveted:
To make the platform, first find stiff cardboard-stock paper, preferably with a glossy surface (magazine cover, folded in thirds?). Poke a hole in its center using a pushpin and then using the enlarging thumbnail. [If cardboard isn't handy, fold aluminum sheet into two or more times to create a flat surface.] Insert a fresh toothpick in the hole and push gently against the sides of the hole to slightly enlarge the hole to a barely-larger-than-toothpick diameter. Drop the Canimation™ Aluminoid™ in the paper hole so that the bottom rests flat against the flat paper.
Extinguish all light sources. Shine your phone's flashlight (or an actual flashlight) towards the back image, but leave the front of the can that's facing you in the dark. Spin slowly; then faster, until the spinning dancer is moving at the desired speed. You'll need three hands to make this work -- one to hold the light source, one to hold the stiff paper platform in the correct orientation relative to your line of sight, and one to spin the toothpick. Or, if you have a shoe box handy, then you can use it as a holder. Make a hole in its top for the toothpick, and tape it to a table.
The zoetrope, invented in 1834, is a simple animation device. It is a spinning cylinder having a filmstrip inside its circumference that is viewed through slots in its side. It's lit from above, and several observers standing around it can look through the slots to see the illusion of a moving image as the barrel spins.
I recommend that you start with this illusion. It's the spinning dancer, by Nobuyuki Kayahara. The spinning dancer is an interesting optical illusion because the dancer spins clockwise or counterclockwise depending on the way your brain processes the image at the time.
Notice from the photo above that the girl is facing frontwards or backwards – and jumping from her front or back leg – depending on how you color her arms, legs, ponytail, face, chest, and posterior. If you look at the left image, the middle dancer will spin clockwise in your peripheral vision. Switch your gaze from the left dancer to the right dancer and you'll see the middle dancer instantly reverse her spin.
Here's a set of clockwise-spinning dancer images for you to print out:

Print the pdf document out at ACTUAL RESOLUTION, in a 1-to-1 ratio, from your printer. You'll need to look in the pdf print menu to delete the scale-to-fit feature; and also you'll need to set the print command to print the document in the Landscape orientation).
Here's another similar illusion I found on the internet. If you block out her face by shielding it with your hands, you can see how her torso rotates in a circle, without reversing itself.
Zoetrope filmstrips are not that hard to make. Pick a movie or gif. Simple, high contrast, slow motion images work best. Extract eight individual images from it that are equally time-spaced. Save each image and print it at the correct size for the zoetrope panels (for the Canimation™, .875 inches wide). Cut images, apply to panels with adhesive or tape, and spin away. I recommend PhotoScape (free software) for editing images and ezgif (free online service) for extracting images from a gif and VLC (free software) for extracting images from a movie. You can get these programs for free from download.com. Of course, if you want to get fancy and use soda can sheet metal to make replacable wheels with slots in them to insert in your zoetrope, you can.
You might be tempted to print the images in a strip, cut the slots away, curl the strip into a tube, and tape it in the zoetrope. It's difficult to make this work. You've got better alignment cues by placing the images individually using the features of the can as your guide.
When making the center hole in the bottom of the can, you need to find the exact center. Using the Centerfinder and locating it from the interior produces a hole that's hard to shove the toothpick through (unless you flatten the hole from the exterior side after making it). There's an easier alternative method. Place a pushpin against the center of the exterior side of the can-bottom and rotate the can. The pushpin tip should automatically migrate toward the exact center — or else you will see the tip spinning in a small circle if it's off-center.